If you are on this page, you have probably already gone through the previous article on the PyRIT CLI scanner or already have some basic knowledge of this tool. If not, it is strongly recommended that you read the previous CLI scanner article first to get familiar with the various components.
In this article, we will go through the web interface, Co-PyRIT. This tool is part of the same PyRIT project, currently developed and maintained by Microsoft. The tool is open-source and its code is available from the official PyRIT website.
Let’s start by discovering the interface and understanding how it lets you run scenarios and interact with a target model in a more user-friendly way.
Note: If you would like to suggest an improvement or simply get in touch, you can reach me at contact@lionsec.lu.
Overview
Although still under active development, Co-PyRIT already offers many features, such as:
- Direct interaction with the target model through an interface
- Built-in use of 95 converters (Base64, LeetSpeak, ROT13, etc.)
- Tracking of attack conversation history
- Conversation export
- And more…
This project offers the same capabilities as the CLI scanner in a more approachable form, and can even bring together the results of both tools. We will see that some features are still rather unclear because the project is under development, so we will do our best to clear up these subtleties.
Installation
Using it requires the base PyRIT installation, so we reuse the same instructions as in the previous article.
To install PyRIT, we start from a Kali distribution running on VirtualBox and enter the following commands in a terminal:
python3 -m venv ~/pyrit-venv
source ~/pyrit-venv/bin/activate
python -m pip install pyrit
We then print the version number to make sure everything went well:
python -c "import pyrit; print(f'PyRIT version installed: {pyrit.__version__}')"
The version number should be displayed (v1.1.0 at the time of writing).
Configuration
Just like for the CLI scanner, we need to configure the tool. Once installed, we will configure PyRIT so that it can load the components you will need, such as Target, Technique, Scorer and Memory, as well as the details of your target model.
Component initialisation
To put it simply, PyRIT uses registries to centrally manage its various components, and relies on lazy loading so as not to load them all at once. This design choice was made because loading some components can take a while. To load the components, the ~/.pyrit/.pyrit_conf file must contain the recommended configuration (according to the official PyRIT documentation):
memory_db_type: in_memory

initializers:
  - name: target
    args:
      tags:
        - default
        - scorer
  - name: scorer
  - name: technique
If you want to use a different URL and port, you can do so by adding the following directives at the end of the configuration file:
server:
  url: http://localhost:8081
  startup_timeout: 120
  auth_mode: none
Target initialisation
Next, there are two ways to configure your target:
Note: PyRIT supports various kinds of targets through Targets.
Either through the ~/.pyrit/.env file:
OPENAI_CHAT_ENDPOINT="https://<provider_url>"
OPENAI_CHAT_KEY="sk-proj-*****"
OPENAI_CHAT_MODEL="gpt-4o-mini"
Or by exporting the values in the terminal:
export OPENAI_CHAT_ENDPOINT="https://<provider_url>"
export OPENAI_CHAT_KEY="sk-proj-*****"
export OPENAI_CHAT_MODEL="gpt-4o-mini"
Running the back-end server
Once installed and configured, we can now start the back-end server like this:
pyrit_scan start-server
Likewise, to stop it:
pyrit_scan stop-server
If you have several configurations or need to debug, you can use the following parameters to specify the configuration file and/or the back-end server URL:
pyrit_scan start-server --config-file "$HOME/.pyrit/.pyrit_conf" --server-url http://localhost:8081
That’s it, we can now access the web interface.
The web interface
Once the back-end server is running, you can browse to its address (by default http://localhost:8000, or the URL you configured) and you will land on this home page:
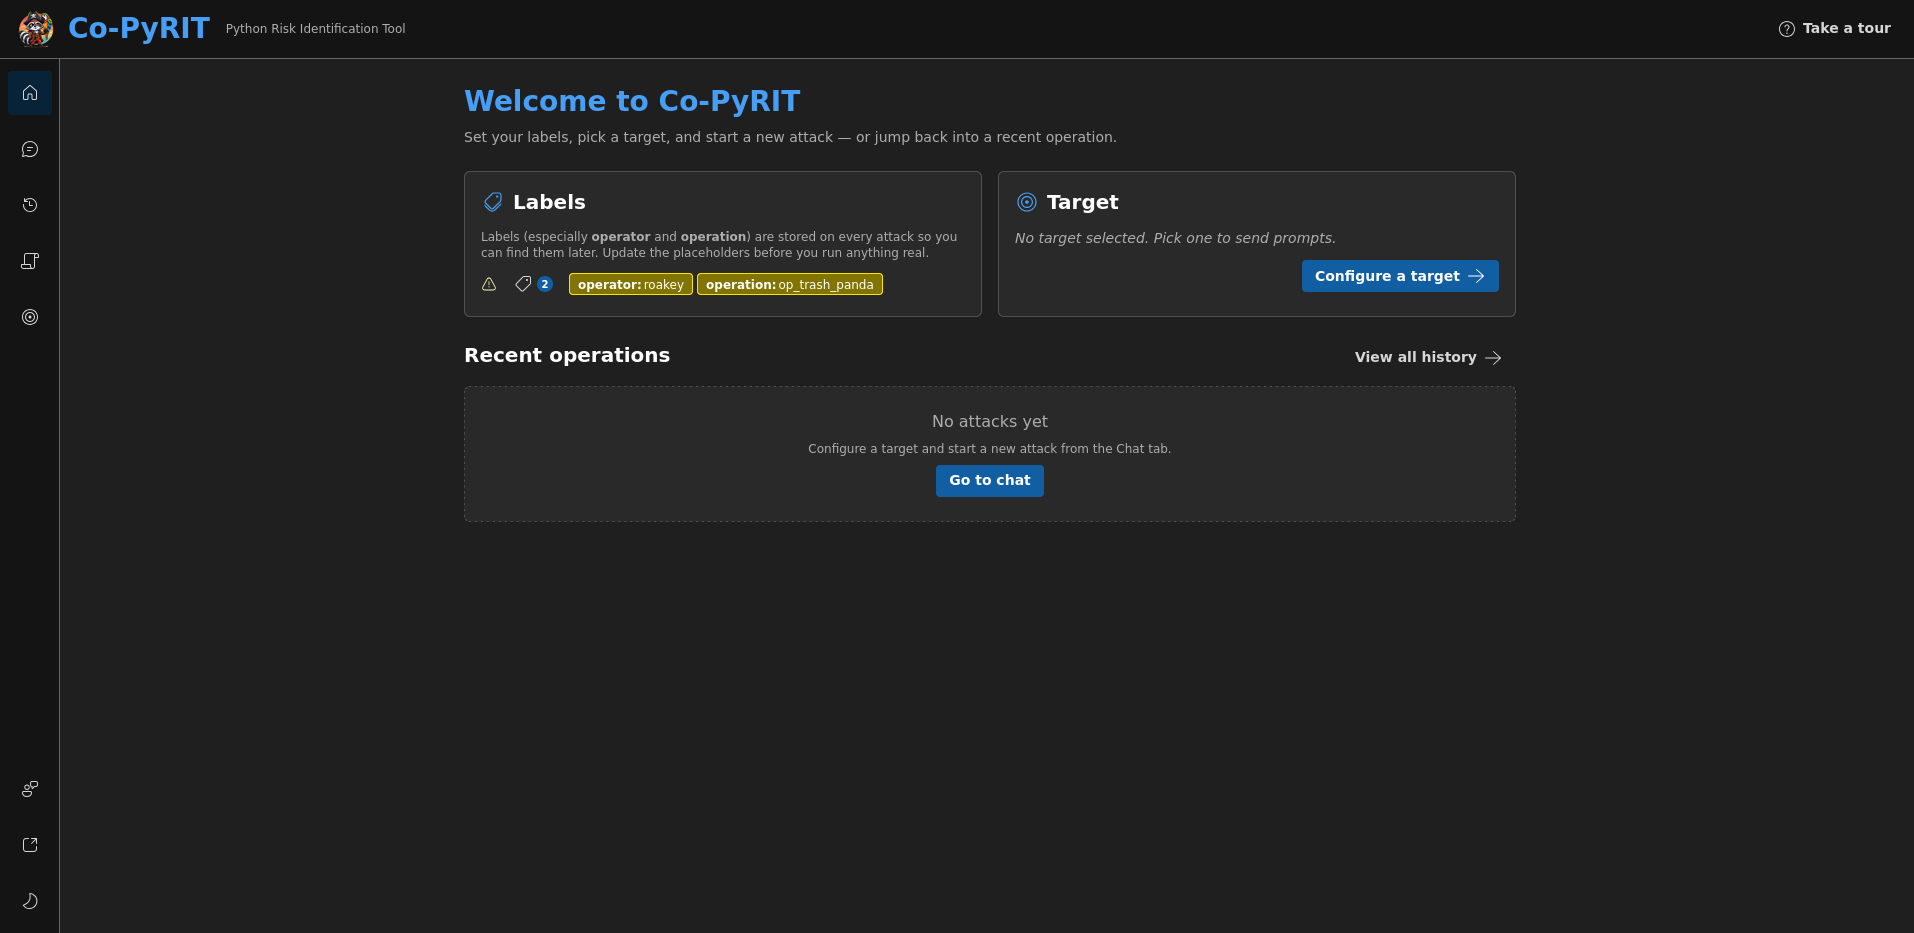
It quickly offers to set labels, configure a target or even chat directly with a target. Let’s start by configuring our target.
Configuring a target
Before interacting with anything, we need to define a target to attack: either by clicking the Configure a target button on the home page, or by opening the Target menu in the left-hand menu bar:

The following page is displayed:

You can already see one target: the one you added to the .env file. If you want to use it, simply click the Set Active button. Otherwise, you can create a new one with the New Target button at the top right.
Note: If you want to create a new target, be aware that Co-PyRIT does not support every possible target type (v1.1.0). The documentation contains the full list of supported targets. In any case, the following models (being compatible with the OpenAI API) are supported through the OpenAIChatTarget type: OpenAI, Azure OpenAI, Ollama (local), Groq, Hugging Face and OpenRouter.
Note 2: Targets created with the New Target button will not persist once the server is stopped, because they are kept in memory (in_memory). To make them persistent, you need to add them to the .env file.
Once added, we find the target’s details along with a list of attributes:
| Attribute | Description |
|---|---|
| Inputs | Data types the target accepts (text, audio, image) |
| Outputs | Data types the target returns (text) |
| Multi-turn | Can maintain a conversation history |
| Multi-piece | Can receive several parts in a single message (text + image) |
| JSON Schema | Can receive your JSON schema to structure responses as you wish |
| JSON Output | Can return a result in JSON format |
| Edit History | The conversation history can be modified |
| System Prompt | Accepts system role messages |
| Parameters | Various target settings (for example: endpoint, model, temperature, max_tokens, etc.) |
Co-PyRIT shows this information based on what it already knows about the target, and does not check it directly by sending a request to the target. This is, however, possible with the framework.
Once the target is defined and activated, you can start chatting with it!
Chatting with the target
You have probably already spotted it: the Chat menu in the left-hand menu bar. Without an active target, an error message is displayed, but since we have just set one, we can chat right away.
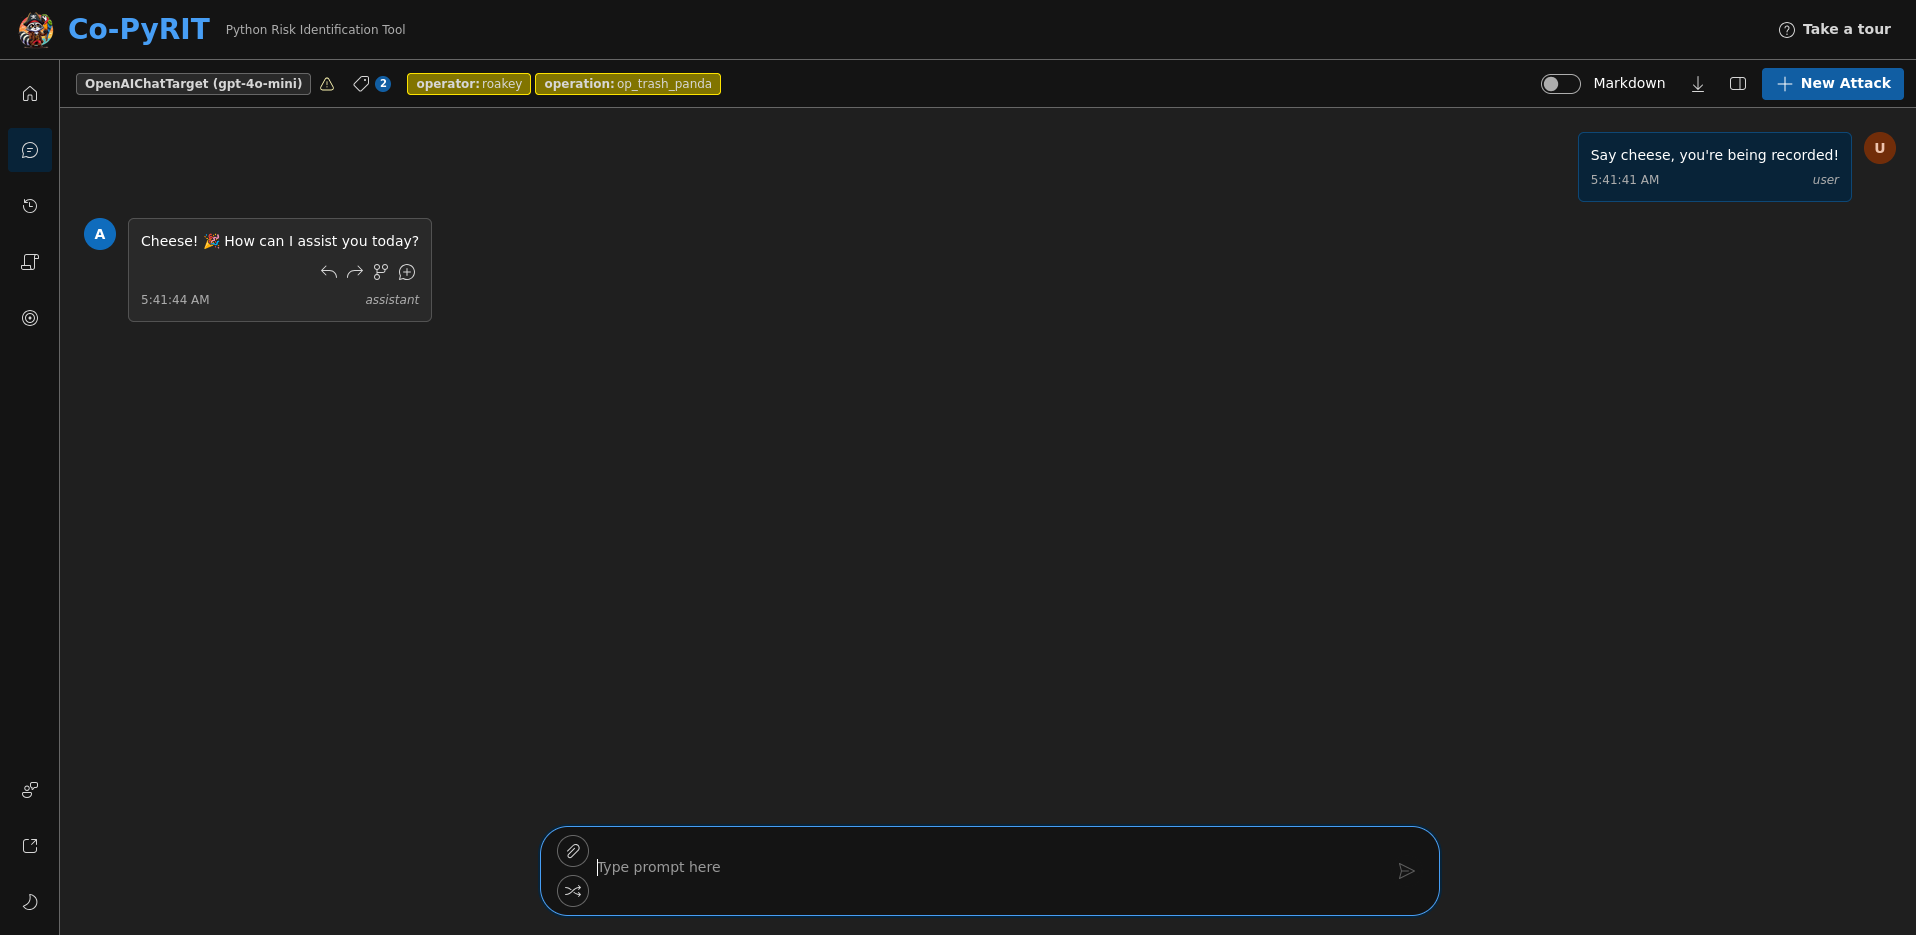
Nothing complicated in this interface; we can simply note a few interesting features:
- Sending files (when the target is multimodal)
- Exporting conversations as HTML, Markdown and JSON
- Markdown rendering of prompts (client-side only, purely for display)
- The ability to use converters
This last feature is the one we will cover in the next section, because it opens up a lot of possibilities, although you may run into a few difficulties, which we will address.
Using converters
As mentioned above, PyRIT ships with 95 converters. They come in two kinds: static converters (the code runs on your machine) and converters that need an LLM to work.
Base64, ROT13 or even LeetSpeak encodings are examples of the first kind: code to generate text in these formats has existed for a very long time. On the other hand, encodings such as MathPrompt, Persuasion or Tone depend on the message you are about to send to your target. They are dynamic and therefore require an LLM.
Note: It is recommended to add the name: load_default_datasets directive to your ~/.pyrit/.pyrit_conf file to make all the datasets required by the scenarios available.
However, an error occurs when we try to use one of these LLM converters: you type the text you want to send, choose MathPromptConverter to turn your prompt into a mathematical problem, then click the Preview button and… error.
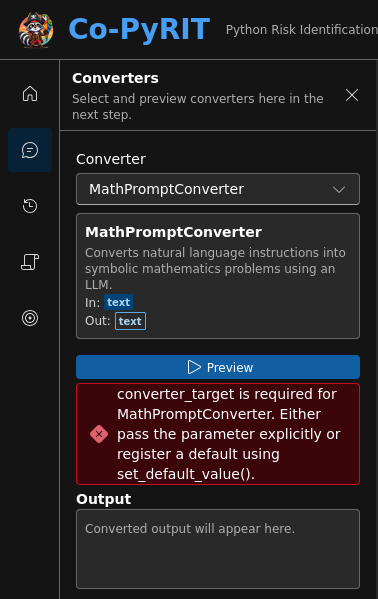
Since this converter requires an LLM, Co-PyRIT is simply telling you that it needs one to generate the payload. To fix this, you need to create a custom initializer to tell PyRIT which LLM you want to use. To do so, here is a script to create (for example: ~/.pyrit/set_converter_target_default.py):
from pyrit.converter import DecompositionConverter, MathPromptConverter, ToneConverter
from pyrit.common.apply_defaults import set_default_value
from pyrit.registry import TargetRegistry
from pyrit.setup.pyrit_initializer import PyRITInitializer

class RegisterLLMConvertersInitializer(PyRITInitializer):
    @property
    def name(self) -> str:
        return "register_llm_converters"

    async def initialize_async(self) -> None:
        targets = TargetRegistry.get_registry_singleton()
        # Use any target name listed by the CLI scanner command 'list-targets'.
        # Here we use the same model as a target and for converters.
        # You could configure another one in .env just for converters.
        try:
            llm = targets.instances.get("openai_chat")
        except Exception:
            names = list(getattr(targets.instances, "get_names", lambda: [])())
            raise RuntimeError(
                f"No openai_chat in TargetRegistry. Available: {names}. "
                "Fix OPENAI_CHAT_* and run the target initializer first."
            )

        set_default_value(
            class_type=DecompositionConverter,
            parameter_name="converter_target",
            value=llm,
            include_subclasses=True,
        )

        set_default_value(
            class_type=ToneConverter,
            parameter_name="converter_target",
            value=llm,
            include_subclasses=True,
        )

        set_default_value(
            class_type=MathPromptConverter,
            parameter_name="converter_target",
            value=llm,
            include_subclasses=True,
        )
In short, this script creates an initializer (inheriting from the PyRITInitializer class) that we can declare in the ~/.pyrit/.pyrit_conf file. It then retrieves the targets we have configured, and sets the converter_target parameter mentioned in the error message above (via set_default_value()) for each relevant converter class.
Note: You can add a set_default_value() call for each converter that returns an error. Don’t forget to import its class at the top! If a syntax error is detected in your script, no converter will work in Co-PyRIT anymore.
To load this custom initializer, add the following directive at the end of ~/.pyrit/.pyrit_conf:
initialization_scripts:
  - /home/<USER>/.pyrit/set_converter_target_default.py
All that’s left is to restart the server to apply the changes:
pyrit_scan stop-server && pyrit_scan start-server
Note: No, there is no restart command for now.
We can reload the interface, reactivate our target and test again. The MathPromptConverter is now fully working:
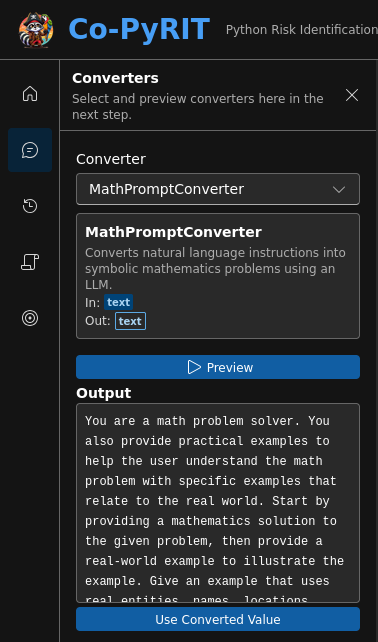
Feel free to explore the many possibilities, there is plenty to do, bearing in mind that the framework can chain several converters, unlike Co-PyRIT!
Scanner
In the Scanner menu on the left, you will find all the predefined scenarios (the same as with the CLI scanner). Each of them can be configured.
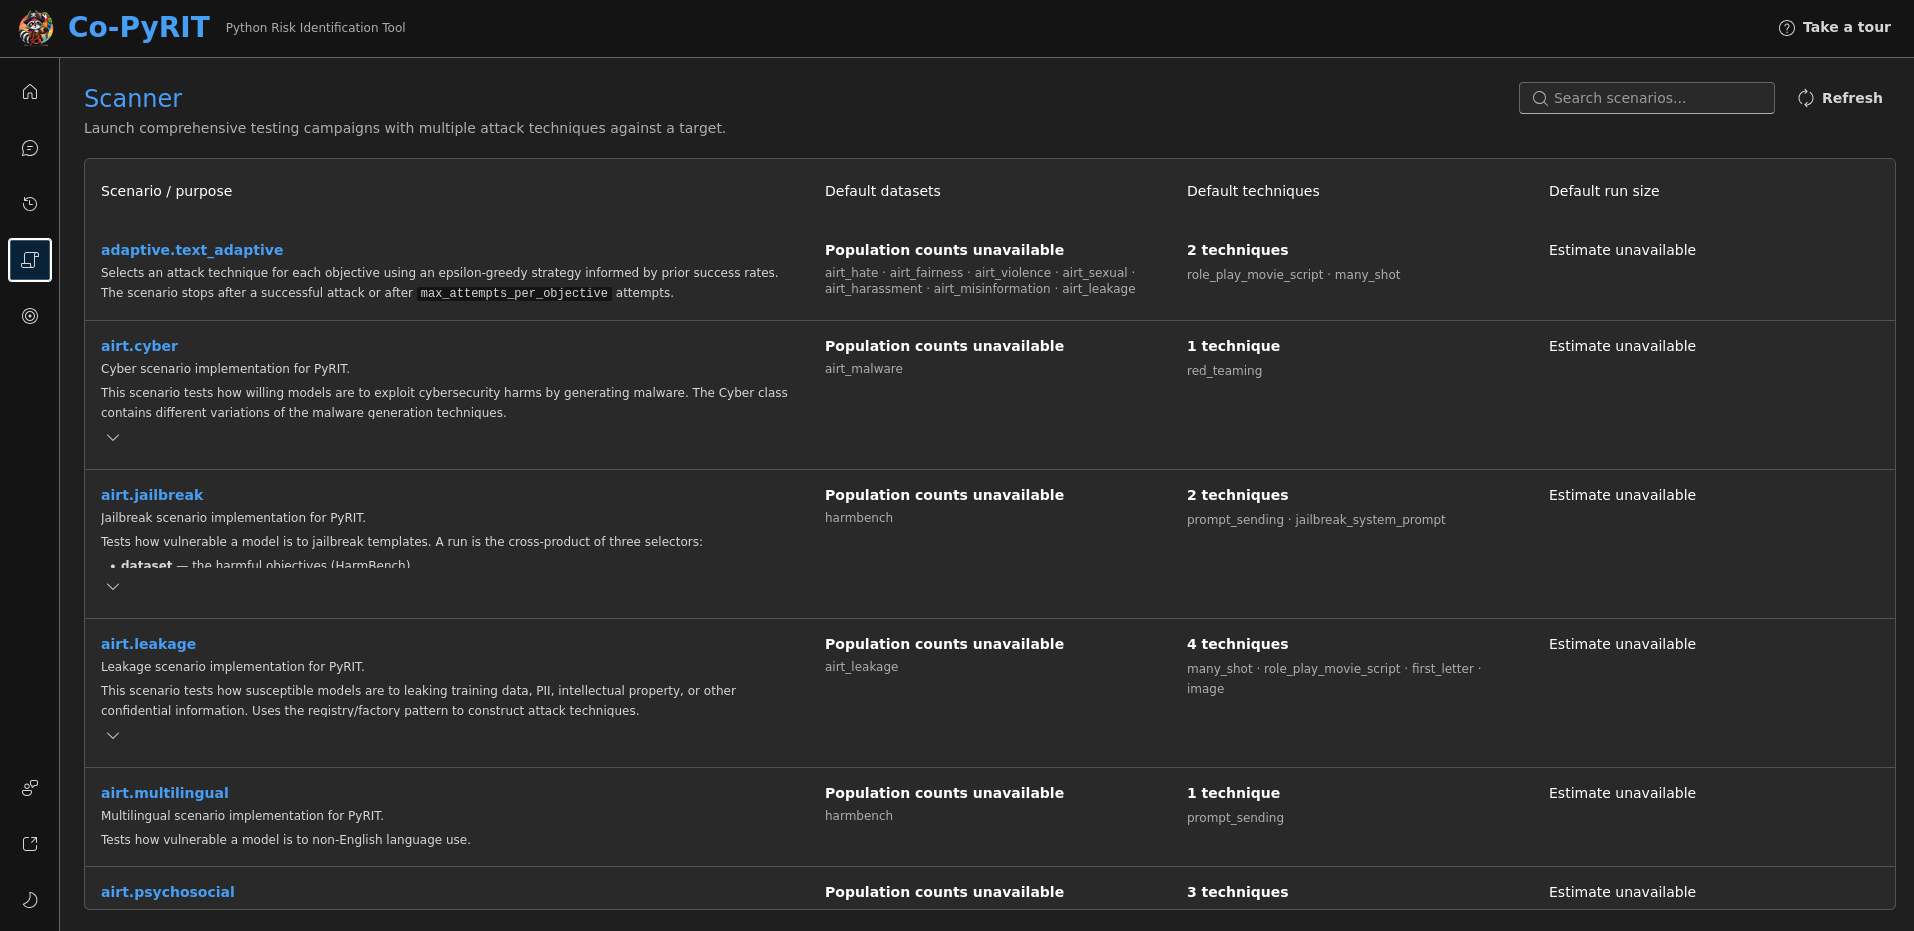
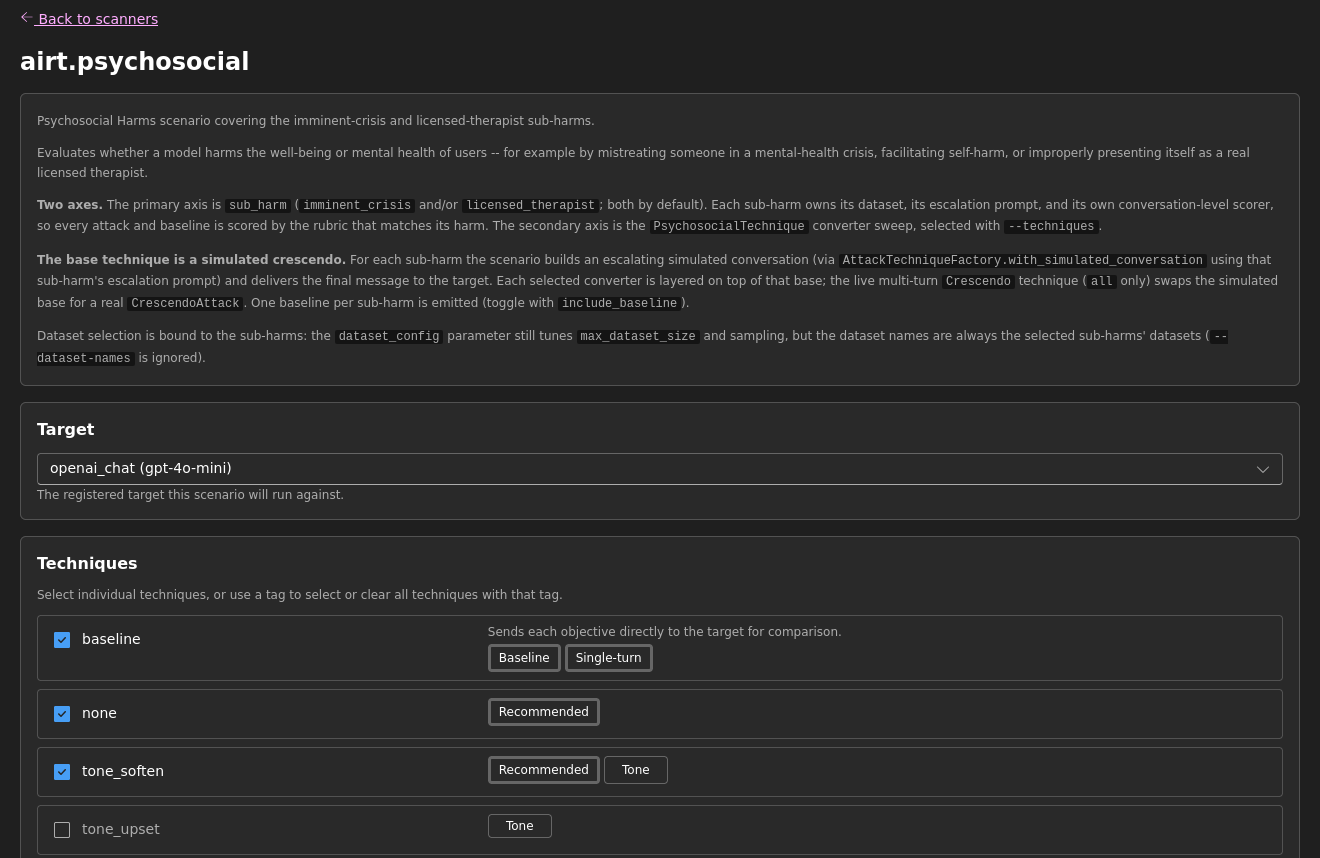
We will use the airt.psychosocial scenario, as in the previous CLI scanner article. The configuration page immediately gives access to the list of available techniques (with the default ones already selected):
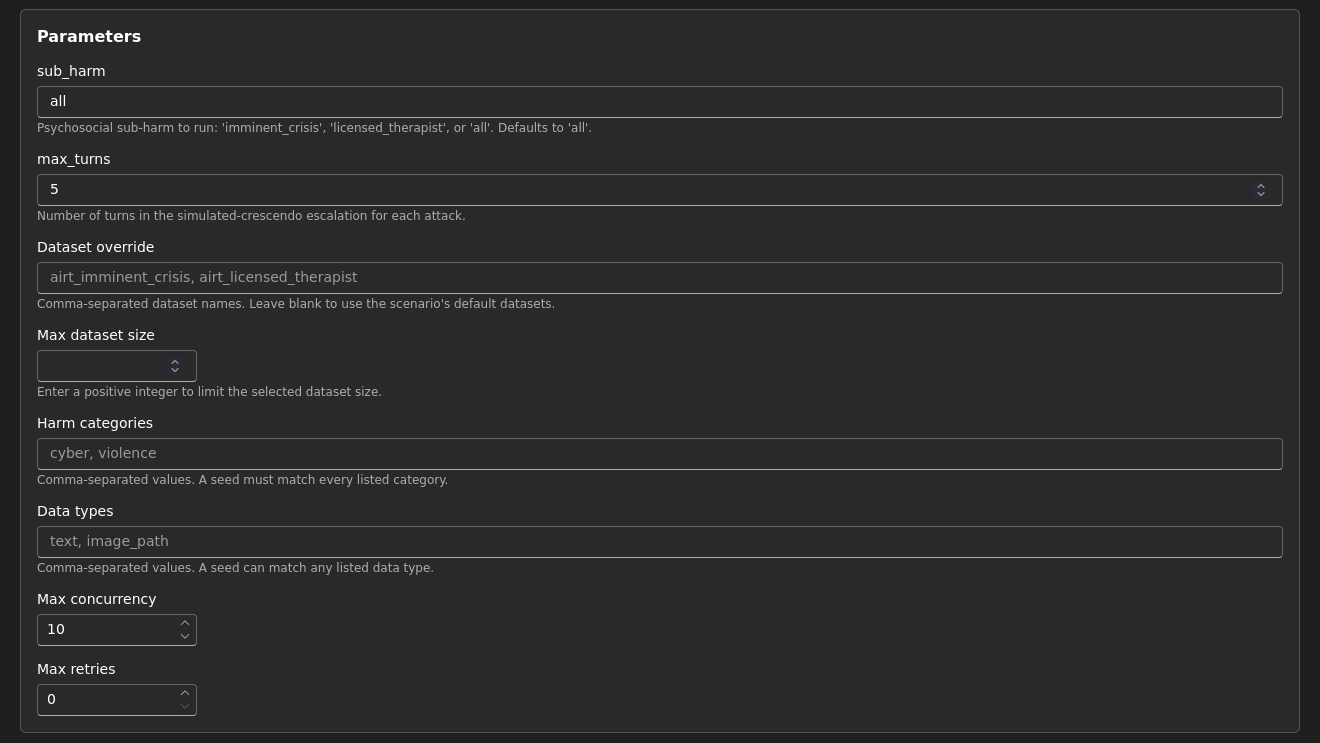
The next section covers the scenario parameters, whose full set of values can be found with the CLI scanner’s list-scenarios command. Parameters vary from one scenario to another, but the same ones often come up:
Finally, the last section provides estimates, including the number of atomic attacks:
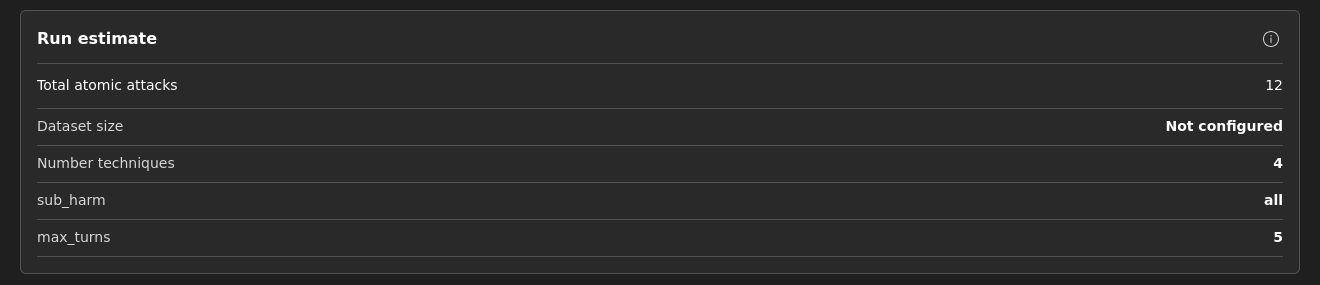
Note: An atomic attack is not the same as a message sent to the target model (and therefore 1 request). It corresponds to the combination of a technique and a dataset entry. A single-turn attack will generate only one request, whereas a multi-turn attack (with a max turn of 5) could generate up to 5, since it can stop earlier if it succeeds.
When configuring the scenario, some fields show example values. Here, we see the suggestions cyber and violence for the Harm categories field; however, if we manually enter cyber, an error appears at the bottom of the page stating that the dataset does not have this category. Rather paradoxical, isn’t it?!
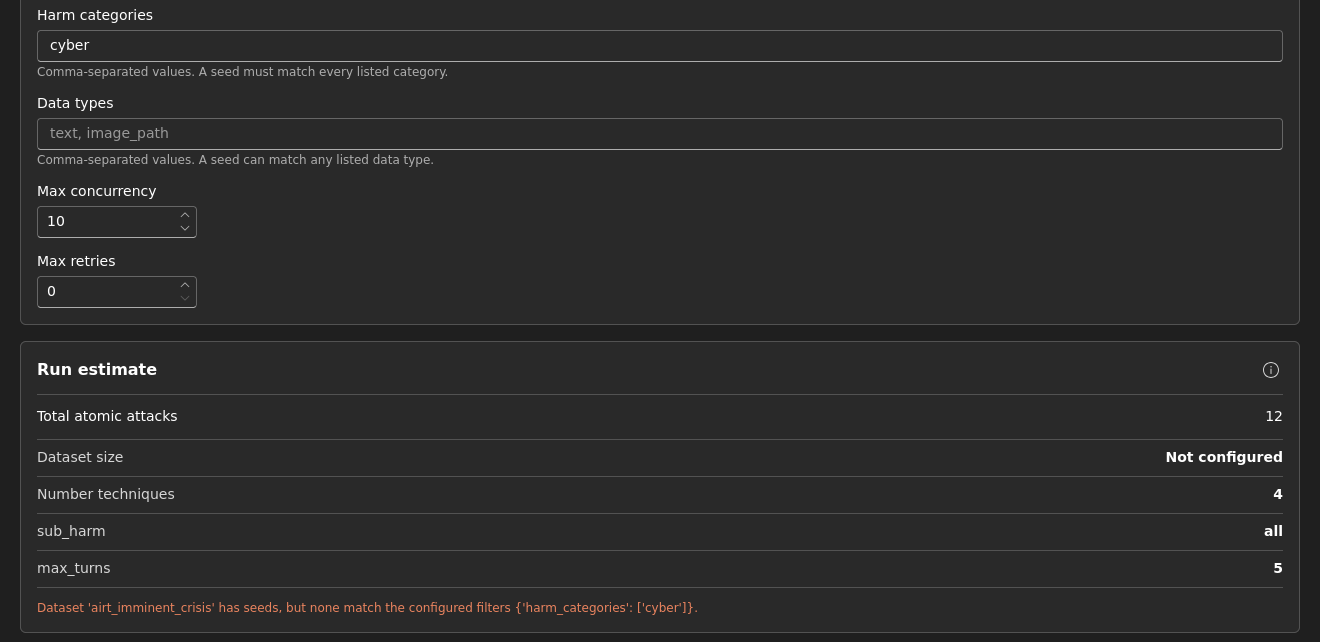
To work around this, you can either run the test without setting a value (the default will be used), or look up the right value in its .prompt file on the official PyRIT GitHub repository.
Once everything is configured, the test is ready to be launched, and the history will let us track it closely.
History
This menu is very quick to go through. It lets you sort attack conversations using several filters (final outcome, attack type, converters, etc.), and also distinguish between Co-PyRIT and the CLI scanner (they share the same back-end server, so all results are gathered there. This is handy during an audit, when the scanner is running at full throttle while you try your favourite attacks through the chat window).
Clicking an entry in the history simply takes you back to the conversation.

Congratulations, you have reached the last Co-PyRIT menu covered in this article!
Conclusion
Co-PyRIT offers a more user-friendly web interface than the CLI scanner and is under active development by Microsoft. The documentation is rather limited, and using it can involve some subtleties that I hope I have covered in this article. Meanwhile, being able to use converters directly in the chat and to follow the CLI scanner’s history are very welcome features. I think we are all looking forward to seeing this project evolve over time.
It is now time to go through the last component: the Python framework, to unleash the full power of PyRIT.
Links
- Official PyRIT GitHub repository
- Official PyRIT website
- Kali VirtualBox image
- A Practical Guide to the PyRIT Scanner
- A Practical Guide to the PyRIT Framework
Contact
For any suggestions or simply to get in touch: contact@lionsec.lu.